Dưa Cải Chua

Don’t it always seem to go that you don’t know what you’ve got till it’s gone. -Joni Mitchell

It’s hard to believe in the middle of winter, when you’re so hungry for fresh veg you can’t stand it, but by mid-spring sometimes you can get greens fatigue. They just keep coming!

That bounty is wonderful, but when you’re running out of ideas for how to eat them fresh, remember how hungry you were for those greens just a couple months ago. Fortunately, your greens don’t have to go the same way as Joni Mitchell’s proverbial paradise.

Cucumbers, peppers, cabbage, and radishes aren’t the only spring and summer veggies you can pickle. Give your mustard and other spicy, peppery greens the same treatment, and you can have a taste of spring even after summer has passed.

18289798_10101376597390158_235019803_o

Dưa Cải Chua is a Vietnamese dish of pickled Spicy Asian Mustard Greens. It’s simple to make and easy to customize to your preferred palate—you can adjust to find your perfect balance of salt, sweet, sour, and spice. And best of all, you can make it with what’s in your share and a few common items in your pantry.

You’ll need:
2 bunch mustard greens, about 4 pounds
4-6 cloves of garlic
1 bunch of spring onion or white onion
Large pot boiled water
2.5-3 tablespoons salt
3 tablespoon sugar
Sriracha, Sambal Oelek, minced Sereno Peppers, or Szechuan Peppercorns
Fish Sauce (optional)
Clean mason jars
A Kraut Source fermentation kit (we sell them at our booth!) or ziplock bags & mason jar lids

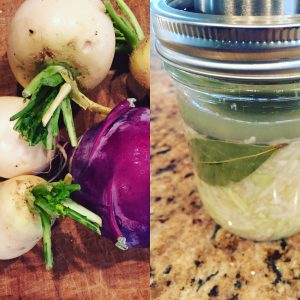
Clean and separate your mustard greens and onions. Pick out any leaves that have gotten too yellow—though a little yellow or limpness is ok, as Dưa Cải Chuaa is a great way to use up greens that have languished in the back of your fridge a little longer than you intended (shhh, we won’t tell). A salad spinner an a little chilled tap water will do the trick.

18261626_10101376691860838_1489664596_o

Dry the leaves and shred, then slice the onions. Some recommend letting the greens air dry and get limp for up to 12 hours. Others to simply pat dry with paper towels. It depends on how much time and counter space you have, and how fresh your mustard greens are. Once your leaves are dry, massage them till they are even more limp and even start to sweat a little. Mix with your onions and garlic and set aside.

Rinse your mason jars with boiling water to sterilize them. While the jars are cooling, use remaining boiled water to make a brine with the salt, sugar, and whatever spices you are adding. Taste with a clean spoon as you go to make sure you like the level of heat and balance of flavors.

Sriracha will produce a sweeter, milder Dưa Cải Chuaa. Sambal oelek will be spicier. Minced serano peppers are more traditional, but can get very spicy very quickly. Sezchuan peppercorns will be a different flavor—making the dish more Chinese than Vietnamese— and the level of heat will depend on how fresh your peppercorns are. Fish sauce will make it saltier and add an extra briny, umami flavor.

18261341_10101376597285368_1326493658_o

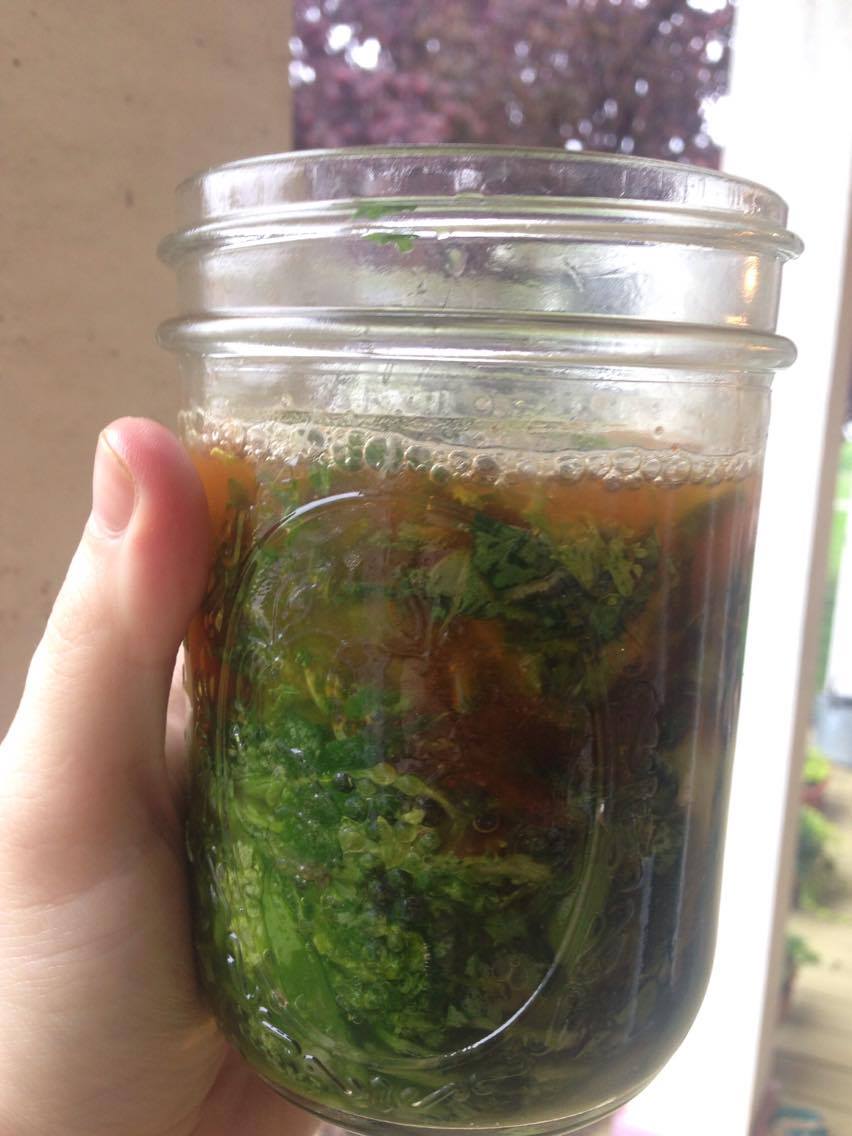
Pack your jars with the blend of mustard greens, onions, and garlic as tightly as possible. Press them down with a rubber spatula, which you can also use to break up air pockets. Pour the brine in with a funnel, until the greens are covered by at least an inch of brine. Don’t overfill your jars though—you want the brine to sit just below the neck of the jar, at least an inch from the lid.

This is when you either screw on your Kraut Source fermentation kit lid or, if you don’t have one, gently press a plastic bag into the mouth of the jar. Fill with tap water, taking care not to spill. The water will press the baggie flush against the top of the brine, making the contents air tight. Secure lip of the baggie to the mouth of the jar with a rubber band.

18261675_10101376597365208_1316923617_o

Let the Dưa Cải Chuaa sit on your counter for a week. After it’s done fermenting, take your baggies or Kraut Source lid off, and replace with regular mason jar tops. The Dưa Cải Chuaa will keep for months in the fridge unopened, much like kimchi or sauerkraut.

Traditionally, Dưa Cải Chuaa is eaten much like kimchi or kraut, used to add flavor to soups, salads, meats, rice, and more. Add it to stir fry, grain bowls, eggs, or noodle dishes.


18261624_10101376691850858_654425559_o

If you used Szechuan Peppercorns for more of a Chinese flare, add your pickled greens to Dan-Dan Noodles, a traditional spicy Szechuan dish made with thick, chewy noodles in a spicy soy-based sauce. For a Japanese-style meal, fry some of your Dưa Cải Chuaa (called Takana in Japan) in sesame oil before adding to rice.

Or if you want to stick close to Vietnam, you can make Canh Dưa Cải Chuaaa beef soup with pickled mustard greens. Or add to another Vietnamese dish Thịt Kho. a slow-braised pork dish with eggs. It would also be wonderful in Pho.


Kale Salad with Apples and Peanuts from the Kitchen of Blackwell Smith

Hello from Tant Hill Farm! With the abundance of Nutrient dense greens this time of year our body screams out for them! Its part of the seasonal eating. With these greens are beautiful stems that are full of nutrition as well. Some may cut the stem out and use the tender leaves. but please don’t throw them away. There are multiple uses for these stems, check out This website for some great ideas. If you are unable to use the stems, an addition to a compost bin or pile will guarantee it goes back into the earth. Below is a recipe from Blackwell Smith. His recipes are quick and delicious. Have fun with your Greens and stems, your body will love you for it!

From Blackwell Smith:

Stems in greens. What do you do with these? Basically if you don’t simmer them in a pot, puree in a smoothie or slice them very small, you may end up with something undesirable, tough or stringy. We have a recipe that will help you get the most out of your produce. It’s simple, easy and quick. You can keep it in the cooler for few days or eat it right out of the mixing bowl.

Kale salad with apples and peanuts
Ingredients
1 bunch of your favorite Tant Hill Farm kale
1 apple
1/3 cup peanuts
1 teaspoon fresh ginger fine chopped
1 teaspoon Sriracha
1/2 tablespoon soy sauce
1 tablespoon honey
2 tablespoons olive oil
2 tablespoons apple cider vinegar
Directions
-hold kale in one bunch tightly slice stems no more than a 1/8th inch slowly moving up the leaves
-cut apple off of core, lay flat, cut thin strips
– pour all liquid ingredients and ginger into mixing bowl and stir together
– put kale, peanuts and apples into bowl and mix with dressing
– serve now or save for later
You could use almonds instead of peanuts. Oranges can substitute for apples. Summer fest or mustard would make excellent additions or substitutes.
Remember fresh food is the best food!!!

Korean Lacto-fermented Salad Turnips

Hello!

Here is a quick and flavorful way to lacto-ferment those lovely salad turnips from this week’s share. The flavorings used are similar to kimchi – chiles, scallions and garlic – and can be altered to suit your tastes. The 1 teaspoon of red pepper flakes lends a slight spiciness on the finish so feel free to add more for additional heat. Also, I used a lot of garlic in proportion to the turnips, but I love the flavor of fermented garlic. You can always cut back if desired.

We have posted about the tips and tricks to lacto-fermenting before, but there are a couple keys worth repeating:

  • The amount of salt you use is very important. Too little and you run the risk of spoilage, too much and the fermentation may not work at all. I am using a brine of 1 tablespoon fine sea salt to 2 cups of water. I think this is a good starting point but it may take some experimentation to find out what works best for you.
  • Keep the vegetables submerged under the brine. Our favorite way to achieve this is with the Kraut Source canning jar lid. It allows you to make small batches of ferments without committing to too much at once (which is great for those just learning about this process). If you need other ideas, check out this post.

Enjoy!

Korean Lacto-fermented Salad Turnips
makes about 2 cups

Ingredients:

  • 2 cups water
  • 1 tablespoon fine sea salt
  • 10 ounces turnip roots (about 3 small), scrubbed clean, cut in half, and then cut into thin half moon shapes
  • 1 large scallion, cut in half and then cut into 1″ pieces
  • 3 large garlic cloves, peeled and sliced thin
  • 1 teaspoon red pepper flakes
  • 1 teaspoon granulated sugar

Directions:

  • Add 1/2 cup of water and the salt to a small saucepan, cover and heat over medium. Bring to a boil, ensuring the salt has dissolved, and remove from heat. Add an additional 1-1/2 cups of cold water and set aside until it has reached room temperature.
  • Prepare the vegetables and toss together in a medium mixing bowl. Pack into a pint and a half wide mouth canning jar (#42 on the bottom) or evenly divide between two smaller jars. Once the brine is at room temperature, cover the vegetables completely and ensure they are submerged (see top section). Set aside, out of direct sunlight, and test daily until the desired flavor has been reached.
  • Secure with an air-tight lid and transfer to the refrigerator. The ferment should keep for at least a month.

Preserving the Harvest :: Lacto-Fermention + A Sauerruben Recipe!

Hello!

We love fermenting here at Tant Hill Farm so figured it was time to share our tips and tricks to help you lacto-ferment at home. Lacto-fermentation happens when food is submerged in a salty brine and left to sit at room temperature for days, weeks or even months. A specific species of bacteria, Lactobacillus, converts sugars to lactic acid. This process not only preserves food but it also makes it more nutritious and digestible.

There is a lot to learn and we know it can seem overwhelming but it really boils down to the crucial steps listed below. Of course there is more to this – which type of container to use, how to flavor it, etc, but you need to understand these steps first. After reviewing the crucial steps, you will have a greater understanding of the sauerruben recipe below. We hope you enjoy it!

Crucial Steps for Successful Lacto-Fermenting at Home

  • Salt: 
    • Salt is crucial because it both draws liquid from the vegetable, creating its own brine, and also creates an atmosphere where only healthy bacteria can thrive.
      • Amount: most resources recommend using 2% – 5% salt of the fermented vegetables weight. That means trim, peel and cut your vegetables before weighing them and THEN calculate the amount of salt you need. I typically use about 3.5% salt and have had great results (I use sea salt). I would highly suggest investing in a digital scale to make this step easy.
      • Type: do a quick online search and you will find different opinions on whether the type of salt you use makes a difference of not. It comes down to the amount of sodium in your salt, and luckily, it is printed in the nutrition section on the box. Table salt typically has 580mg in 1/4 teaspoon and sea salt has 440mg in 1/4 teaspoon. So, given that I typically measure my salt using a teaspoon or tablespoon, if you use table salt, it will result in a saltier (and sometimes too salty) end product. In the end, I recommend looking at the sodium content on your salt box and if you have a choice, use the salt with the lower amount.
  • Submerge:
    • Lacto-fermentation is an anaerobic process, meaning it happens in the absence of air. That is why it is so important to have all vegetables submerged under the brine and all air-pockets removed. You will often see recipes that state you should add the vegetables a little at a time, pounding them down between each addition. This helps to ensure there are no air pockets remaining. You can also tap the finished ferment on the counter lightly or use a long skewer to remove any trapped air bubbles. There are all sorts of gadgets on the market to help – we love using the Kraut Source but you can use just about anything. It can be as simple as filling a plastic bag with brine and setting it on top to keep the vegetables submerged.
  • Time & Temperature:
    • Time and temperature work hand in hand. You can ferment anywhere between 55°F and 80°F. The lower the temperature, the slower the fermentation and conversely, the higher the temperature, the faster the fermentation. This also affects the flavor – slow fermentations typically have more complex, nuanced flavor whereas fast fermentations can have more intense flavors with a higher chance for off-flavors. There is a useful rule of thumb that states for every 10°C rise in temperature, the rate of reaction doubles. As an example, if it is 10°C (or about 18°F) hotter in your kitchen, expect your fermentation to finish in half the time. In the end, tasting your fermentation every day is the only way to know how it is progressing.

Kohlrabi Sauerruben
makes about 1 cup

Recipe note: traditional sauerruben is made with turnips but I added kohlrabi for an interesting twist.

Ingredients:

  • 15 ounces combined salad turnips and kohlrabi
  • 1-1/2 teaspoons fine sea salt
  • 1 bay leaf

Directions:

  • Trim the salad turnips and peel the kohlrabi. Grate on the large holes of a box grater. I had 8 ounces of grated salad turnips and 4 ounces of grated kohlrabi. The breakdown isn’t as important as the total amount as this determines the amount of salt.
  • Add the grated vegetables and salt to a medium mixing bowl and mix well to combine. Allow to sit for 10 minutes or so to extract the water from the vegetables. You can use any type of fermenting vessel but a pint sized glass canning jar works great here. Add the vegetables a little at a time, pounding them down with the back of a spoon between each addition. There should be enough liquid to cover the vegetables. Add the bay leaf and submerge the vegetables below the brine. If you aren’t using a device that covers the top, cover with cheesecloth and secure with a rubber band. Allow to ferment as desired. I find that I like my ferments after a week or so. Once it is to your liking, cover with a lid and transfer to the refrigerator. I have kept ferments for months and months in the refrigerator but this probably won’t last that long.

Preserving the Harvest :: Miso Pickles

Hello!

The Walking to Spring CSA started this week and I couldn’t be happier to a refrigerator full of fresh produce. Let us know how your thoughts on this session – we would love to hear from you!

I wanted to share with you a preservation technique that you may find fun and useful. It is called Misozuke, which is a Japanese miso-cultured pickle. It is really easy and you only need a couple ingredients – miso and veggies. See below to learn more!

Basics
This is a pretty simple process but there are a few key steps to keep in mind:

  • Create a miso-doko: this is the miso pickling paste. You can use any type of miso you have on hand – white and red are the most common. You can use one type or mix together various types. You can add a little sake and/or mirin which will loosen it up and make it easier to submerge the vegetables (I think I will try this next time). Some recipes add other flavorings at this point, such as ginger and garlic.
  • Prepare your vegetables: you could probably use just about any vegetable but turnips, Daikon, kohlrabi and celery are the ones I have seen most often. I am sure broccoli, carrots, scallions and even the stems from your greens would work great. You can cut your vegetables any size but most are sliced about 1/2″ thick or cut into matchstick sized pieces. Whatever size you choose, be sure they are evenly sized so they ferment at the same rate.
  • Layer miso-doko and vegetables: you can do this in just about any kitchen vessel – a dinner plate, food storage container or even canning jars. You can spread a layer of miso in the bottom of the container, lay the prepared vegetables on top, and top them with more miso. If you loosened the miso, you may be able to just push the vegetables in the mixture. Some recipes I have found will place cheesecloth on either side of the vegetables to make it easier to get them out but I didn’t bother with that step.
  • Ferment: you have a choice to ferment on the counter at room temperature, in the refrigerator or a combination of the two. Some people will keep the mixture at room temperature for a day and then transfer to the refrigerator for the remaining time. If you decide to keep it in the refrigerator the whole time, as I did, it may take longer to reach a desired outcome.
  • Taste daily: this process is entirely new to me so I can’t provide a great guideline on how long it will take. Some recipes ferment for just a day while others leave it for two weeks. Taste a small piece everyday and simply remove them when they are to your liking.

Other Resources
I recommend checking out the links below to get an idea of the process others use to make these pickles. They are all a bit different but you can gleam a little from each one.

Leftover Miso
You can use the miso bed over and over as long as you like the flavor – some say up to 10 times. Once it loses flavor, however, there are plenty of ways to get use out of it.

  • Tekka: I am fascinated by this savory condiment made by cooking down miso and ground root vegetables. You can find a recipe and learn more about it here and here.
  • Miso-Sesame Dressing: this probably won’t be as full flavored as compared to using fresh miso but still a great option none-the-less.
    • Ingredients: 6 tablespoons water, 1/4 cup rice vinegar, 7 teaspoons red miso, 1 tablespoon soy sauce, 1-1/2 teaspoons honey, 1 (2-inch) piece ginger – peeled and chopped coarse, 1 small garlic clove – chopped coarse, 1/4 cup canola oil, 1 tablespoon toasted sesame oil
    • Direction: Process all ingredients except canola and sesame oil in a blender until finely chopped, about 15 seconds. With the blender running, add oils in steady stream until incorporated, then continue to process until smooth, about 15 seconds. Can be refrigerated for a week.
  • Simple Miso Soup: add a little of the miso paste to a cup and pour boiling water over, stirring to combine. Top with sliced scallions and enjoy.

Radish Miso Pickles
makes about 1/2 cup finished pickles

Ingredients:

  • 1/2 cup white miso
  • 4-5 French or globe radishes, sliced 1/2″ thick or cut into small wedges

Directions:

  • Place 1/4 cup of the miso in a thin layer on the bottom of a glass food storage container. Place the radishes in a single layer on top of the miso. Spread the remaining miso on top of the radishes. Cover and place in the refrigerator until done.

Collard Greens Relish

Hello,

If you have run out of time and/or ideas for your collard greens, give this recipe a try. It couldn’t be easier – just chop a few things and throw all ingredients into a saucepan. It takes a while to cook the greens but most of that time is hands-0ff. Plus, sugar and vinegar are great preserving mediums so you can keep this on hand for a while, making it perfect for last minute guests or to bring to a party.

I have only tried this straight so far but I can imagine it would go well with many different dishes. Slathered on cornbread, with crackers and cheese, tossed with rice and beans – anything that needs a sweet and tangy punch of flavor.

Enjoy!

Collard Greens Relish (adapted from here)
makes about 1 cup 

Ingredients:

  • 1/2 pound collard greens, stems removed and thinly sliced, leaves chopped into 3/4″ pieces
  • 6 medium scallions, white and light green parts only, thinly sliced
  • 1 jalapeno, seeded (or half of seeds removed for spicier relish) and minced OR 1/2 teaspoon red pepper flakes
  • 1/2 cup sorghum syrup
  • 1/2 cup apple cider vinegar
  • 1 garlic clove, minced
  • 1/2 teaspoon kosher salt
  • 1/8 teaspoon espresso powder
  • 1/8 teaspoon ground cinnamon
  • 1/16 teaspoon ground nutmeg
  • 1/16 teaspoon ground clove
  • Freshly ground black pepper to taste
  • 3 cups water

Directions:

  • Add all ingredients to a medium saucepan, cover and bring to a boil over medium heat. Reduce heat to medium-low and simmer, stirring occasionally, until collards are tender, about 40 minutes. Remove lid and continue to cook, stirring occasionally, until a small amount of syrupy liquid remains, about 20 minutes longer. Remove from heat and allow to cool slightly. Transfer to an air tight container and store in the refrigerator for 2-4 weeks.

Preserving the Harvest :: Stem Preserves


Hello,

We hope you all enjoyed a Thanksgiving filled with your favorite food and people.

We also hope you have been enjoying the wealth of greens in your CSA share each week. The kale, collards, Swiss chard, arugula, tatsoi, pak choi, mustard greens, and broccoli rabe have been plentiful lately! The only downside to so many greens is that you are left with a lot of stems, which are typically not included in recipes where you use the greens. You can always juice or add them to smoothies but we realize it’s nice to have other options. That is where this recipe comes in handy.

Sugar is the most recent category of foodstuffs to be vilified in the media, and for good reason. It’s not hard to find articles, like this one, this one and this one, that make you think twice about eating anything with a trace of sugar. But as with almost anything in life, moderation is key. Plus, sugar is a great preservative. The reason why is explained below:

“…sugar attracts water very well; the more sugar there is in any solution, the more water it tries to draw from its surroundings. This is bad news for any microbe that happens to be inside a jar of jam. High concentrations of sugar will suck the microbe’s vital water right through its cell wall, causing it to dehydrate. This process is called “osmosis,” and it can be deadly for bacteria and mold.”

So while I would never suggest adding a lot more sugar to your diet, I think preserving some items with the use of a simple, inexpensive ingredient can bring some simple joy to everyday life.

I originally developed this recipe as a way to use some beet stems that were way too pretty to toss into the compost heap. But why couldn’t it work for other stems as well? The stems are cooked down with sugar, bourbon and spices over a long enough period that any tough stems are sure to soften and take on the added flavors while imparting a little of their own too. And I think you can take the flavorings in all sorts of fun directions – play around with different types of booze, sugars and flavorings. I haven’t tested those below but really, how could they turn out bad?!

  • Gin, granulated sugar, rosemary, orange zest/juice
  • Gin, granulated sugar, Earl Grey tea, lemon zest/juice
  • Gin, pomegranate molasses, mint, lime zest/juice
  • Bourbon, honey, grapefruit zest/juice
  • Bourbon, granulated sugar, pineapple, ginger
  • Tequila, agave nectar, chile peppers, orange zest/juice
  • Vodka, honey, lemon zest/juice, lemon verbena
  • Vodka, honey, blackberries, rose

I used the stems from 4 beets in my original recipe and therefore only had about 1/2 cup of preserves in the end. Going forward, I plan to toss all of my unused stems into the freezer throughout the week. At the end of the week, I will thaw out the stems overnight and then thinly slice when ready to proceed with the recipe.

I think this would be an awesome addition to a cheese plate but there are so many other possibilities. Grown up peanut butter and jelly, anyone?!

Stem Preserves
makes about 1/2 cup

Ingredients:

  • 1 cup thinly sliced beet stems (from 4 medium beets)
  • 1 cup water
  • 1/4 cup bourbon (I used 1816 Cask from Chattanooga Whiskey)
  • 1/4 cup packed light brown sugar
  • 1-3″ cinnamon stick
  • Pinch of ground cloves
  • 3″ piece of lemon peel, white pith removed
  • 5 grinds fresh black pepper
  • 1-2 teaspoons freshly squeezed lemon juice

Direction:

  • Place all ingredients except the lemon juice in a medium saucepan and mix to combine. Bring to a boil, then reduce to a simmer and cook, stirring occasionally, until most of the liquid has evaporated but with a small amount of syrupy liquid remaining. Transfer to a small, air-tight jar and cool to room temperature. Taste, adding lemon juice as needed to balance the sweetness. Store in the refrigerator for up to 2 weeks.

Preserving the Harvest :: Freezing

Hello!

Of all the ways to preserve food, freezing is probably my favorite. It’s a great way to preserve the nutrients of fresh food for an extended period of time, leaving one with lots of meal ideas. It is relatively quick and you don’t need any fancy equipment, just some extra storage containers. The downside, however, is space. Unless you have a deep freezer, you will be limited on the amount of food you can safely store in the freezer (your freezer won’t work efficiently and keep food as cold as it should be if it is stuffed to the brim).

If you aren’t familiar with freezing food, check out this, this and this website for information on how freezing food works and how to do it safely. Here are the tips I think are most important:

  • Click here for a list of foods that don’t freeze well.
  • Click here for a run down of storage containers.
    • To this, I would add that I prefer freezing items, especially sauces, in ice cube trays. Once frozen through, I transfer the cubes to a ziperlock bag. Others have recommended freezing soups and stews in a similar fashion but in muffin tins.
  • Here is a general guideline on how long foods can be frozen. Note: this depends on if food is stored in the appropriate package and at the correct temperature.
  • No one likes freezer burn – here are some great tips on how to avoid it.

Below are some of my favorite ways to make the most out of my seasonal produce and freezer space.

  • Soups & Stews:
    • Most soups and stews are great for the freezer but here are a few that ARE NOT:
      • Cream or dairy based soup/stews might separate when thawed (although it is possible to whisk to recombine)
      • Soups/stews that include delicate seafood won’t have a great texture when reheated
      • Those thickened with eggs or cornstarch may turn out watery
      • Potatoes change texture and breakdown when thawed, which might be ok depending on the dish, but just something to keep in mind
    • Here are some ideas for soups and stews that work really well in the freezer:
      • Pureed soup: winter squash, tomato, potato, cauliflower, broccoli and carrots all make an excellent base for pureed soup. I haven’t tried this yet, but I doesn’t this pureed Kale and Apple Soup sound like a great way to make a freezer ready meal with your greens?
      • Lentil/bean soup/stew: red lentils are a staple at my house (typically curried red lentils with greens) and they make a fantastic make ahead meal that is perfect for the freezer. This is a pretty straight-forward recipe that can be doctored up anyway you like. But don’t limit yourself to lentils – chickpeas, black beans, white beans and pinto beans are all great.
      • Grain based soup/stew: almost all grains will freeze well except for white rice. It usually turns mushy. Stick with brown or wild rice (like this recipe) and you shouldn’t have any problems.
      • Meaty soup/stew/stew: chilis and other meat based soups and stews freeze really well.
  • Sauces:
    • Most sauces, unless cream based, will freeze really well. Here is just a brief list of options:
      • Tomato based sauces, such as marinara
      • Oil based sauce, such as chimichurri
      • Pureed sauces, such as pesto
      • Peanut sauce
      • Fruit based sauces, such as cranberry sauce
      • BBQ sauce
  • Blanched Veggies:
    • Raw vegetables need to be blanched before freezing in order to stop the enzymatic activity that will degrade the nutrients, flavor and color. This is a great overview on the blanching process and how long to blanch different types of vegetables.
  • Veggie Cubes:
    • This is great for the weeks when you can’t get through all of your greens. Simply add the leaves and any tender stems to a blender with a couple cups of water. Process on high until fully broken down. Add more greens, process again, and continue this process until you have a thick but still flowable puree. Pour the puree into ice cube trays and freeze until frozen through, usually about 12 hours. Remove cubes from the tray and place in a zipper lock bag. Use in smoothies, soups or stews.
  • Fruit:
    • Fruit is one of the easiest things to freeze: wash fruit and dry thoroughly. Place on a lined baking sheet and freeze. Once frozen, transfer to a plastic bag or vacuum sealed bag.
  • Compound Butter:
    • Compound butter is a so easy to put together and can turn a boring meal into something special. It is also a great way to integrate any herbs you haven’t found another use for. I make a batch, freeze it, and then slice off chunks and add it to anything that needs a little flavor boost. You don’t really need a recipe: just add some of your favorite flavors to softened butter until well combined. Then form the butter into a log, wrap in plastic wrap and freeze (here is a step-by-step tutorial). I recently made a compound butter with parsley, green garlic, smoked paprika and sweet paprika and it is a big hit!
  • Herbs:
    • It never occurred to me that you can freeze hardy herbs such as rosemary and thyme right on the branches. This blog post reports almost fresh tasting herbs after a year in the freezer!
    • Place chopped fresh herbs, such as parsley, cilantro or basil, in ice cube trays and cover with olive oil or water. Freeze until frozen then transfer to a plastic bag.
  • Baked Goods:
    • Baked goods, such as quick breads, muffins and snack cakes are great for the freezer. We will all get sick of zucchini by the end of the summer, at which point it’s time for zucchini bread! But don’t limit yourself to zucchini – try sweet potatoes, beets, and squash in your quick breads.

Let us know your tips, tricks and favorite freezer recipes!


Preserve the Harvest :: Dehydrated Greens + Recipe

Hello!

I just went through a week of intense preserving to help Mark & Gina use up pounds and pounds of kale and collards, along with some parsley and edible flowers, that would have gone to the compost heap otherwsie. I could have made it easier on myself by just processing the greens in two or three ways but I couldn’t control myself and ended up preserving by: making soup, blending and freezing greens, making and freezing compound butter, fermenting, dehydrating and steeping edible flowers in a sweetened apple cider vinegar mixture (called a shrub – more to come on this!). I list all of these items to give you some insight into the various paths I used to preserve the harvest. Each process has it’s upsides and downsides. For example, blending kale with water and then freezing it in ice cube trays is really simple and cheap (no added ingredients) but freezer space is limited and how many kale cubes does one really need?

Dehydrating has tradeoffs as well – it is simple to prepare, relatively hands off and the finished product can be stored at room temperature. However, it is energy intensive as each batch has to dry for hours at a time (even tender greens take 2 hours in my dehydrator). For someone with limited time, however, I think the tradeoff is worth while.

The dehydrating process is really simple:

  • Wash greens well
  • Dry well
    • I put mine through a salad spinner and then pat them dry with a clean towel.
  • Remove ribs and cut into desired shapes
    • If you are against wasting the ribs, I would at least cut them out and then dehydrate them separately from the leaves as they will dry at different rates.
  • Season if desired
    • This step depends on how you intend to use the greens. If you want to eat them as “chips”, I would suggest tossing them with at least a little oil and salt (see below for recipe idea). If you just want to dehydrate them in order to throw them in soups later, you can probably skip this step.
  • Dehydrate
    • Using a dehydrator: I have tried various temperatures but find that 135 degrees works best for greens. It only takes 2-3 hours at this temperature, whereas it can take hours and hours more if you drop it down much lower. I know raw foodist don’t cook anything over 104 degrees as they believe the nutritional value is lost. This may be true but since dried greens are such a small part of my overall diet, I don’t worry about it much.
      • If you don’t have a dehydrator but are looking to purchase one, this article gives a lot of helpful information.
    • Using an oven: I have never dehydrated food in an oven so I would do your own research if this is the route you wish to take. From what I have read, most ovens don’t go below 170 so you have to prop the oven door open to maintain the correct temperature. It seems like this could be difficult to control but I would love to hear from anyone who tries it.
  • Store in an airtight container in a cool, dark, dry spot.
    1. This is a good article to understand where and why dehydrated food should be stored and how long you can expect it to last.

In the end, you can dehydrate just about anything. Since greens are so plentiful right now, give this a shot if you are out of other ideas!

Spiced Swiss Chard Chips

Recipe notes: 1) depending on the size of your dehydrator, you may be able to fit more greens at once. I am using a round, 4 level Nesco dehydrator.

Ingredients:

  • 1 tablespoon vegetable oil
  • 1/4 teaspoon five spice powder
  • 1/4 teaspoon ground turmeric
  • 1/8 teaspoon cayenne, or more if desired
  • 1/8 teaspoon table salt
  • 1/2 pound (about 15 medium leaves) Swiss chard, washed and dried thoroughly

Directions:

  • Whisk oil, spices and salt together in a large mixing bowl. Set aside.
  • Trim Swiss chard ribs and set aside. Cut leaves into desired shapes. I cut the leaves in half along the ribs and then cut each half into halves or thirds, depending on the size.
  • Place leaves in the mixing bowl and toss gently but thoroughly with the spices. Arrange the leaves on the dehydrating trays, taking care not to overlap them too much.
  • Dehydrate at 135 degrees F, checking after 2 hours to see if they are crisp. If not, continue to dehydrate, checking every 20-30 minutes. Allow to cool to room temperature and transfer to an airtight container. Store in a cool, dry place. These should last for months but I bet they won’t stick around that long 🙂