There are few foods as comforting as homemade bread. The wonderful aroma, the warmth when it’s fresh out of the oven, the slight tug when you tear it apart, and then the flavor – it really does enliven all senses. Unfortunately, making bread from scratch can be an all day (or multiple day) affair. So when I am looking for the comfort of homemade bread without the time commitment, I turn to flatbreads.
Flatbreads start with a dough made of flour, water and salt that is then rolled out thinly. They are typically unleavened so the hassle of letting the dough rise and ferment is eliminated. Almost every culture has flatbreads and the list is quite extensive. You are undoubtedly familiar with some versions, such as tortillas, pita, naan and johnnycakes.
The recipe below is based on one from the cookbook Plenty by Yotam Ottolenghi. It is a vegetable based cookbook with dishes and flavors inspired by the Middle East. It’s not a cookbook you own because you can easily make every dish – it is one you own to inspire a new way of thinking and cooking with vegetables and grains. He served these flatbreads with a barley and mushroom ragout but I just ate them straight from the pan! I thought they would be a great substitution for naan but I could also envision using them in place of flour tortillas.
Enjoy!
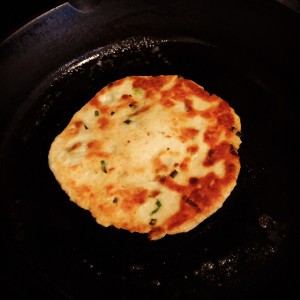
Green Onion Yogurt Flatbread
makes 6 – 6″ flatbreads
Recipe notes: 1) I like using butter to cook the flatbreads but found that it too easily burns when using it alone. I would recommend using a little butter and a little oil in combination to raise the smoke point; 2) feel free to add some other flavors to this, especially spices as they won’t throw off the ratio of flour and liquid (I think smoked paprika would be great!).
Ingredients:
- 1 cup (5 ounces) all purpose or whole wheat flour (or a combination of the two)
- 1 1/2 teaspoons baking powder
- 1 teaspoon kosher salt
- 3/4 cup Greek yogurt
- 1/4 cup thinly sliced green or wild onions
- 3 tablespoons fat of choice (butter, vegetable oil, olive oil)
Directions:
- In a medium mixing bowl, whisk together the flour, baking powder and salt until combined. Add the yogurt and onions and mix until a cohesive dough is formed. I found it much easier to mix everything together by hand. The flour should be fully hydrated and the dough will be just slightly sticky (the dough is very forgiving so add a little more flour if it seems too wet or sticky or more yogurt if it seems dry). Knead for a minute or so and then form into a 1″ disk. Wrap with plastic and chill for an hour in the refrigerator.
- Divide the dough into six equal pieces. Roll into balls, then flatten with a rolling pin until they are quite thin (mine were probably 1/8″ thick, similar to a thick flour tortilla, but feel free to adjust the thickness to your liking). Heat 1/2 tablespoon of fat (or a combination of fats – see recipe note) in a large skillet (I used cast iron) over medium heat until hot but not smoking. Cook for 1-2 minutes on each side or until golden brown. Repeat with remaining dough rounds, adding more fat to the pan as needed. Serve or allow to cool completely and store in an airtight container in the refrigerator for a week.


