Quinoa & Chickpea Lettuce Cups

Hi!

Romaine lettuce is often associated with Caesar salad but we think it makes a great lettuce cup too. Unlike butter lettuce, which is very tender, it holds its shape well and you don’t have to worry about it crumbling underneath your filling. Also, our romaine is harvested when the outer leaves are only about 6 inches long, which makes it the perfect size for this application.

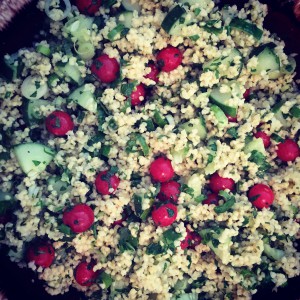
The filling variations are endless. Quinoa cooked in the way described below provides a good, sticky base for the other items but you can use millet, rice or any other grain you have on hand. Switch out the beans and use black, kidney, cannellini or even French lentils (or choose another protein source all together). You don’t have to use the olives or capers but I would include something with a bit of punch – chopped pickles, sun-dried tomatoes or some kind of chopped fermented vegetable. I like a little extra crunch from the celery but you can leave it out if desired. Choose whichever spices you like best and make it your own!

Quinoa & Chickpea Lettuce Cups
serves 4-6 as a main meal

Recipe note: below I suggest topping the lettuce cups with crumbled feta for ease but I think a feta or yogurt based sauce with fresh herbs would take this over the top. I am thinking of something like this recipe.

Ingredients:

  • 1 tablespoon olive oil
  • 1/2 medium yellow onion, finely diced
  • 2 large garlic cloves, minced
  • 1 cup washed quinoa
  • 2 cups water
  • 1 (15 ounce) can chickpeas, rinsed
  • 1/4 cup sliced olives
  • 1 tablespoon drained and rinsed capers
  • 3 tablespoons thinly sliced celery (from about 3 small stalks)
  • 1/2 teaspoon dried oregano
  • 2 tablespoons extra-virgin olive oil
  • 2 teaspoons red wine vinegar
  • Salt and freshly ground pepper to taste
  • Romaine lettuce and feta to serve

Directions:

  •  Heat oil in a medium saucepan until shimmering. Add the onion and cook, stirring often, until softened and just starting to brown, about 5 minutes. Add the garlic and cook, stirring frequently, until fragrant, about 30 seconds. Add the quinoa and water and bring to a boil. Reduce heat to medium-low, cover and cook until all the water is absorbed, about 16 minutes. Remove from heat and allow to sit for 10 minutes. Transfer to a medium mixing bowl.
  • Add the chickpeas, olives, capers, celery, oregano, oil, vinegar and salt and pepper and stir well to combine. Taste and adjust seasoning as needed. Serve on romaine lettuce leaves topped with crumbled feta if desired.

Chickpea, Cashew & Collard Green Patties

Hello,

It was so, so lovely to meet / see again those who attended the first CSA shareholders meeting! I loved spending time and sharing a meal with such an enthusiastic, dedicated group. I look forward to more meetings in the future!

This is the recipe for the patties I served at the meeting. You can use any type of greens or even other vegetables, you just want to squeeze out as much excess moisture from whatever you use. The patties won’t firm up if there is too much moisture. Also, I would suggest playing around with the size of the patties and adjust them to your liking. I thought mine were a bit thin and could have come out of the oven 5 minutes earlier. It’s all up to your personal preferences and how you plan to serve them.

The recipe is adapted from here. You will notice she adds hot peppers, which I would totally be on board with if I wasn’t sharing these with a 2 year old 🙂

Chickpea, Cashew & Collard Green Patties
makes about 14 patties

Recipe notes: I didn’t try this, but I assume these patties could be made ahead and frozen.

Ingredients:

  • 1-1/3 cup raw chickpeas
  • 2 tablespoons vegetable oil
  • 1 large yellow onion, finely diced
  • 10 ounces (about 10 large leaves) collard greens, de-stemmed and roughly chopped
  • 1 cup raw whole cashews
  • 4 garlic cloves, minced
  • 1 teaspoon kosher salt
  • 1/2 teaspoon freshly ground black pepper
  • Buns, avocado, sauerkraut and hot sauce to serve

Directions:

  • Place chickpeas in a large bowl and cover with water by at least 2 inches. Set aside and allow to soak for at least 8 hours or preferably, overnight.
  • Line a rimmed baking sheet with aluminum foil and liberally coat with non-stick cooking spray and set aside. Adjust oven rack to the middle position and preheat to 375 degrees.
  • Heat oil in a 12″ skillet over medium heat until shimmering. Add the onion, season with salt and pepper, and cook, stirring occasionally, until lightly browned, about 5-7 minutes. Add the greens and cook, stirring often, until tender, about 5-10 minutes (depending on the type of greens you use). Set aside and allow to cool slightly.
  • While the greens are cooling, drain the chickpeas and add them to a large capacity food processor. Add the cashews, garlic, salt and pepper. Drain the greens and squeeze out any excess moisture (I find this easiest to do while the greens are in the colander – press them with the back of a large mixing spoon until most of the moisture is gone). Add them to the food processor and process with the other items for about 1-2 minutes, scraping down the bowl a few times, until the mixture is mostly broken down but you don’t want it to be completely mushy and without some texture.
  • Using a #16 scoop (or 1/4 cup measure) form mixture into patties, about 2-1/2 inches wide and 1/2″ thick. Place in the oven and cook about 30 minutes, flipping once half way through.
  • To serve, I like eating the patties topped with avocado, sauerkraut and Sriracha or hot sauce. You could also serve these on buns or in pita bread with your toppings of choice.


Millet Tabbouleh

Hello!

Tabbouleh is an incredibly fresh Lebanese salad traditionally consisting of bulgur wheat, tomatoes, cucumber and lots of parsley and mint. It sometimes seems like an herb salad with some bulgur thrown in. My version, however, swaps the bulgur for millet, making it compatible with gluten-free diets. I kept the tomatoes, cucumber and herbs (although not quite as much as some recipes call for) but tossed in some chickpeas and feta to make it a full meal.

If you aren’t familiar with millet, read more about it here. Millet can be prepared for salads, per my instructions below, or as a porridge, similar to polenta. However, it is very easy to cross the line from individual grains to a mass of millet. To make sure you don’t end up with porridge, keep these tips in mind: 1) it does not cook evenly – you will be left with some cooked grains while others will be a little toothsome; 2) you need to spread out the cooked millet to cool otherwise the starch from the popped grains will make it impossible to use in a salad.

Enjoy!

Millet Tabbouleh
makes 4-6 servings

Ingredients:

  • 1-1/2 cups millet
  • 3 cups water
  • 1 teaspoon kosher salt
  • 1/4 cup + 1 tablespoon freshly squeezed lemon juice
  • 1/4 cup + 2 tablespoons extra virgin olive oil
  • 1 medium cucumber (about 10 ounces), peeled if thick skinned, and cut into 1/2″ pieces
  • 1 pint cherry tomatoes, cut in half if larger than 1/2″
  • 1 cup thinly sliced scallions (from about 3 large scallions)
  • 1/2 cup + 2 tablespoons minced parsley
  • 2 tablespoons minced mint
  • Salt and freshly ground black pepper to taste
  • 1-15 oz can chickpeas, rinsed and drained, and crumbled feta (optional)

Directions:

  • To cook the millet: first, toast the millet by adding it to a medium saucepan over medium heat. Stir constantly until it smells toasty and the grains are starting to brown, about 4-6 minutes. Add the water and salt, bring to a boil, then cover and reduce heat to medium-low. Cook, stirring occasionally, until the water is absorbed and around two-thirds of the grains are cooked through, about 15-18 minutes. Remove from heat and immediately transfer to a rimmed baking sheet. Spread evenly and allow to cool. Transfer to a large mixing bowl, breaking up any clumps of millet.
  • Whisk the lemon juice and olive oil together in a small bowl and set aside. Add the remaining ingredients and the lemon juice/olive oil mixture to the millet and toss to combine. Taste and adjust seasoning as needed.

Collard Green Falafel

I absolutely love falafel. I could eat it every day and be a very happy person. Especially when there’s hummus, pita and olives served along side. But to make authentic falafel, one needs to start with dried chickpeas (something I don’t always have on hand) and remember to soak them overnight (which I rarely remember to do). You don’t actually cook the beans when falafel are made this way which ensures a nice dense texture. While the recipe below yields falafel that are a little softer than the traditional version, they are a great, quick alternative.

The recipe below was adapted from The Minimalist Baker. They are all about simple recipes that can be made with 10 ingredients or less. Check out their blog if that type of cooking is up your alley!

Collard Green Falafel
makes about 25 1.5″ patties

Recipe note: I made a batch of these with almost twice the amount of collards (7.5 ounces/4 cups). I had to add more flour to keep them together and then cook them longer, but if you want to pack in more greens, it’s an option!

  • 4 ounces collard greens, stemmed and roughly chopped into 2″ pieces (about 2.5 cups) (see recipe note)
  • 1 (15-oz) can chickpeas, rinsed and drained
  • 3 medium cloves garlic, minced (about a teaspoon), or more if desired
  • 1 tablespoon tahini
  • 1 tablespoon fresh lemon juice
  • 1/2 teaspoon ground cumin
  • 1/8 teaspoon ground cinnamon
  • 1/2 teaspoon table salt
  • 5 grinds fresh black pepper
  • 3 to 4 tablespoons all-purpose flour
  • 1/4 cup olive or vegetable oil

Directions:

  • Add all ingredients except the flour and oil to a large food processor and pulse to combine. I like to keep just a little texture in the beans if possible and not completely puree everything, so just keep pulsing, stopping to scrape down the bowl when needed, until you get the right consistency. Taste and add more seasoning (salt, cumin, garlic) if desired.
  • Transfer mixture to a medium mixing bowl and add 3 tablespoons of flour to start. Mix to combine and add the extra tablespoon of flour if the mixture doesn’t stay together when you clump a little up in your hand.
  • Portion out 1 heaping tablespoon of the mixture onto a rimmed baking sheet lined with aluminum foil. Form into a 1-1/2″ wide by 1/2″ tall disk. Continue until you have used up the remaining mixture. Set aside.
  • Heat 2 tablespoons oil in a 12″ skillet over medium heat until shimmering. Transfer roughly 12 disks to the oil, making sure not to crowd the pan. Cook until brown and crisp on the first side, about 5 minutes, then flip and cook another 5 minutes on the second side. You may need to add just a little more oil to the pan after flipping in order to get the second side crisp. Once cooked, transfer to a paper towel lined plate to drain. Repeat with remaining oil and mixture. The falafel will firm up a bit when allowed to cool. Serve and enjoy.

Healthy Chickpea Snacks (Alice O’Dea Article)

Hello!

We wanted to share yet another great article from a Tant Hill CSA member, Alice O’Dea. This week, she is exploring the wonderful world of roasted chickpeas. Simple, healthy and affordable – it’s just the thing to make along with all of the wonderful greens you are getting right now. You can read the article here but I have also posted the text below. We hope you enjoy!

Well, we made it to March, folks. And we’ve reached that sweet spot in the year where a few of us have not yet abandoned our New Year’s resolutions, others are enduring Lenten sacrifices and the (very brief) spring preview we enjoyed this past week has some people already thinking about getting shaped up for summer togs.

If you fall into any of those categories, I’ve got a snack for you! It’s high in protein, low in fat, packed with nutrients and fiber; and it’s gluten-, nut-, soy-, sugar- and grain-free! It also can be packed with as much flavor as you’re willing to give it.

I’m talking about roasted chickpeas. This is a really cheap and easy treat to make at home. All you need are some chickpeas (dried or canned), a bit of oil, and some optional seasonings and spices. The prep takes just moments, and the rest is just baking time. When you’re done, you’ll have a snack or garnish that can add protein to your diet and keep you feeling sated for hours.

Start with the chickpeas. If you’re using the dried variety, you’ll have tocook them (or if you put in a little extra the last time you made a batch, pull them out of the freezer). If you’re using canned chickpeas, drain and rinse them.

Either way, you don’t want the chickpeas to be at all damp, so dry them in some fashion. Some options are to run them through a salad spinner, blot them between towels, or—if you’re one of the few people who thinks ahead—put them on a baking pan and let them sit in a cold oven overnight.

I consulted almost 20 recipes for roasted chickpeas, and all but one of them called for roasting them in a oven that is anywhere from 375 to 450 degrees (the lone maverick suggested skillet roasting them in some oil on the stovetop over medium-high heat for about 20 minutes). If you pick the middle ground, that will put your oven at somewhere around 400–425 degrees.

While the oven is heating, mix up whatever flavors you want for your beans. There is a lot of room for improvisation here. You can shoot for a total of about a tablespoon of spices per can of beans (which is equivalent to about one and a half cups of cooked chickpeas). Use a combination of powdered cumin, chilies, coriander, ginger, cayenne pepper, garlic, onion, paprika, cinnamon, curry, turmeric, allspice or garam masala. Other things you might want to include are crushed toasted nuts or seeds, nutritional yeast, or ground herbs (such as rosemary, thyme, marjoram or sage). Some recipes I looked at also called for adding a few squirts of liquid ingredients such as maple syrup, soy sauce, tamari, liquid aminos, liquid smoke, or lemon juice and/or zest.

Mix your seasonings in a bowl, add the chickpeas, and then drizzle them with up to a tablespoon of oil per can of beans. Stir everything together until the chickpeas are coated, season with salt and pepper if you like, and spread the chickpeas out on a baking sheet. Bake until done, which should take anywhere from 25 to 45 minutes. Stir the chickpeas around a little bit every 10 or 15 minutes so they cook evenly, and also to check for doneness. You want them to be crisp and golden. With so many variables at work, your cooking time will probably vary from batch to batch, so keep a close eye on them. I made two versions this week: one with canned chickpeas and another with some that I’d pulled out of the freezer. The canned ones cooked quicker, but the ones I cooked from dried beans ended up being a little lighter and crunchier.

With so many possible combinations of flavors, this is a treat that can hold up to numerous reruns without ever getting tiresome. Enjoy!